개인적으로 MIDI 파일을 처리하는 간단한 툴을 만들어야해서, 그 첫번 째 단계로 MIDI 파일을 분석해서 화면에 보여주는 기능을 만들었다.
이 기능은 실제 런타임의 일부가 아니라 전처리를 위한 툴의 형식이었으므로 사용 언어는 Python으로 하였다.
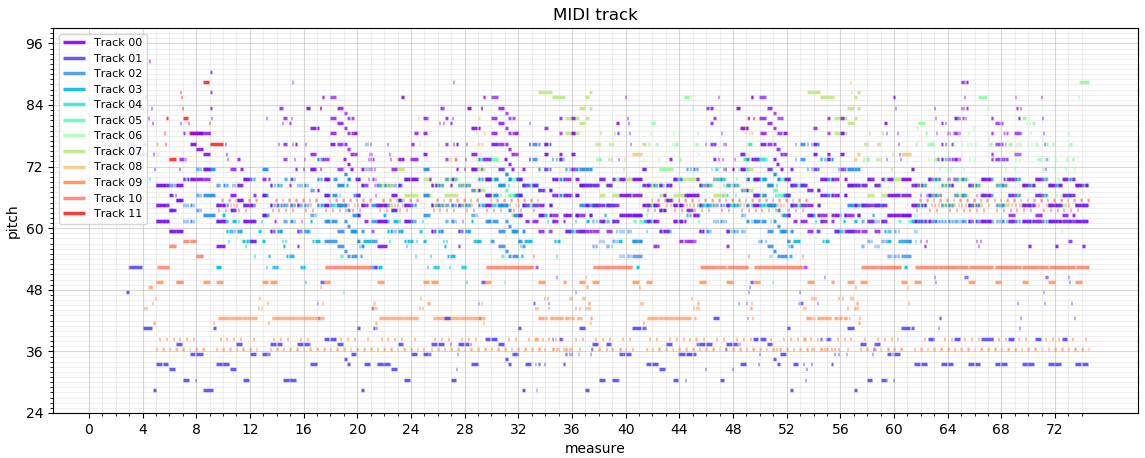
그림 1. 이 앱을 통해 트랙별 MIDI 출력을 한 예
 midi_viewer.zip
import midi
import math
import numpy as np
import matplotlib.pyplot as plt
MIDI viewer를 만들기 위해 사용하는 모듈들이다.
이중에 'midi'는 python-midi인데, 일반적인 방법으로는 3.x에서 설치가 안 되어서
pip install git+https://github.com/vishnubob/python-midi@feature/python3
와 같은 방법으로 설치를 하였다.
그 이외의 나머지는 수치 계산을 위한 모듈(numpy)과 그래프를 그리기 위한 모듈(matplotlib.pyplot)이다.
pattern = midi.read_midifile("somewhere_over_the_rainbow.mid")
pattern.make_ticks_abs()
tracks = midi.Track(pattern)
여기는 MIDI 파일을 읽어서 분해하는 부분인데, pattern에는 MIDI의 헤더부분과 트랙들으로 나누어 저장된다.
MIDI의 tick(일종의 time-stamp)은 항상 바로 앞의 이벤트와의 상대적인 길이로 저장이 되는데, 여기서는 시간대 별로 이벤트를 나열해야 하므로 tick을 절대적인 값으로 변경을 하였다. 그리고 tracks에는 pattern에 있는 트랙의 집합을 꺼내서 따로 저장을 하였다.
resolution = pattern.resolution
bpm = 0
max_channel = -1
beats = 0
beat_type = 0
MIDI의 tick의 단위는 resolution에 의해 정의가 된다. 일반적으로는 ticks per quarter-note 라고 하는데 480 또는 960으로 정의할 때가 많다.
그리고 추가로 더 알아내어야 하는 것은 채널의 개수와 몇 분의 몇 박자인지를 파악하는 것인데, 이것은 MIDI 이벤트를 모두 뒤져봐야 알 수 있는 것이라서 아직은 invalid로 정의하였다. 채널의 경우도 트랙과는 다른 개념이어서 모든 MIDI 이벤트를 확인해야지만 어떤 채널이 사용되었는지 알 수 있다.
4분의 3박자(3/4) 라면 beats = 3, beat_type = 4 를 의미한다.
for track in tracks:
for event in track:
if isinstance(event, midi.events.TimeSignatureEvent):
# data=[4, 2, 24, 8]
if beats <= 0:
beats = event.data[0]
if beat_type <= 0:
beat_type = 1 << event.data[1]
if isinstance(event, midi.events.NoteOnEvent):
if max_channel < event.channel:
max_channel = event.channel
if isinstance(event, midi.events.SetTempoEvent):
tempo_in_msec = (event.data[0] & 0xFF) << 16 | (event.data[1] & 0xFF) << 8 | (event.data[2] & 0xFF)
if tempo_in_msec > 0:
bpm = 1000000 * 60 // tempo_in_msec
여기서는 BPM(Beats Per Minute)과 박자와 제일 큰 채널 번호를 찾는다. (중간에 변경 가능한 값들이지만 그 경우는 고려하지 않는다)
전체 MIDI 이벤트에서 박자 변경 이벤트를 찾은 뒤, 그 이벤트의 data에서 data[0]을 beats로, 2^data[1]을 beat_type으로 둔다.
채널의 경우는 최대 값만 찾도록 하였는데, 중간에 쓰이지 않는 채널이나 특정 용도(drum)로 지정된 채널도 있을 수 있다.
마지막으로 템포 변경 이벤트를 찾은 후에 그 값을 읽는데, 가변 길이가 아닌, 24-bit big-endian 형식의 숫자로 읽으면 된다.
bpm = bpm if bpm > 0 else 72
beats = beats if beats > 0 else 4
beat_type = beat_type if beat_type > 0 else 4
max_channel = max_channel + 1
print("RESOLUTION = {0}".format(resolution))
print("BPM = {0}".format(bpm))
print("MAX CHANNEL = {0}".format(max_channel))
여기에는, 해당 MIDI 이벤트가 누락된 경우에는 디폴트 값으로 설정하게 하는 부분을 두었다.
BPM은 72, 박자는 4/4를 디폴트로 하였는데, max_channel의 경우는 현재 발견된 채널 번호 +1 을 하였다. channel 번호는 0번부터 시작하기 때문이다.
noduvels = [[] for i in range(max_channel)]
for track in tracks:
incomplete = {}
incomplete_2nd = {}
for event in track:
is_note_on = isinstance(event, midi.events.NoteOnEvent) and event.velocity > 0
is_note_off = isinstance(event, midi.events.NoteOffEvent) or (isinstance(event, midi.events.NoteOnEvent) and event.velocity == 0)
if is_note_on:
time_stamp = event.tick / resolution / beats
key = event.channel << 8 | event.pitch
if not key in incomplete:
incomplete[key] = [time_stamp, event.velocity]
elif not key in incomplete_2nd:
incomplete_2nd[key] = [time_stamp, event.velocity]
else:
print("[WARNING] Too many intersections")
if is_note_off:
time_stamp = event.tick / resolution / beats
key = event.channel << 8 | event.pitch
if key in incomplete_2nd:
noduvels[event.channel].append([event.pitch, incomplete_2nd[key][0], time_stamp, incomplete_2nd[key][1]])
del incomplete_2nd[key]
elif key in incomplete:
noduvels[event.channel].append([event.pitch, incomplete[key][0], time_stamp, incomplete[key][1]])
del incomplete[key]
else:
print("[WARNING] Cannot find NoteOn before NoteOff")
assert len(incomplete_2nd) == 0 and len(incomplete) == 0
이전까지가 속성 값을 읽기 위한 작업이었다면, 이번부터는 제대로된 트랙별 note를 읽는 과정이 들어가 있다.
주로 확인할 이벤트는 NoteOn과 NoteOff인데, 일부 DAW에서는 NoteOff 대신 NoteOn의 velocity를 0으로 하여 off의 효과를 내는 것도 있기 때문에 NoteOff의 경우는 조금 더 복잡하게 판단을 한다.
incomplete 변수를 두는 이유는 아직 NoteOff가 일어나지 않은 note들을 임시로 보관하기 위함인데, 간혹 표준과는 다르게 사람의 실수에 의해 같은 pitch의 note인데도 on과 off가 중첩되는 구간이 생기기도한다. 이런 것을 한 번 정도는 허용해 주기 위해 incomplete_2nd 변수를 추가로 두었다.
NoteOff 이벤트가 발생하면 incomplete 에 있는 note를 꺼내어서 완성을 하게 되는데, pitch, 시작 time stamp, 끝 time stamp, velocity를 각 채널별로 저장한다.
(제대로 하려면 expression과 sustain pedal과 pitch bend 등도 저장을 해야 하나, 재생의 목적이 아니므로 생략하였다)
def _getColorList(selected_cmap):
return [selected_cmap(a) for a in np.linspace(0.0, 1.0, max_channel)]
color_list = _getColorList(plt.get_cmap('rainbow'))
sub_plt_1 = plt.figure(figsize=(14, 5)).add_subplot(1, 1, 1)
max_measure = -1
min_note = 128
max_note = 0
for ix_channel in reversed(range(max_channel)):
label_name = 'Track {0:0>2}'.format(ix_channel)
for noduvel in noduvels[ix_channel]:
note = noduvel[0]
x_1 = noduvel[1]
x_2 = noduvel[2]
vel = noduvel[3]
if max_measure < x_2:
max_measure = x_2
if min_note > note:
min_note = note
if max_note < note:
max_note = note
plt.plot([x_1, x_2], [note+0.5, note+0.5], c=color_list[ix_channel], alpha=(vel*0.8/127+0.2), linewidth=2.5, solid_capstyle='butt', label=label_name)
label_name = None
max_measure = math.ceil(max_measure)
plt.title("MIDI track")
plt.xlabel("measure")
sub_plt_1.set_xticks(np.arange(0, max_measure, 4))
sub_plt_1.set_xticks(np.arange(0, max_measure, 1), minor=True)
plt.ylabel("pitch")
sub_plt_1.set_yticks(np.arange(24, 100, 12))
sub_plt_1.set_yticks(np.arange(24, 100, 1), minor=True)
sub_plt_1.grid(which='major', alpha=0.5)
sub_plt_1.grid(which='minor', alpha=0.2)
handles, labels = sub_plt_1.get_legend_handles_labels()
labels, handles = zip(*sorted(zip(labels, handles), key=lambda t: t[0]))
sub_plt_1.legend(handles, labels, fontsize=8, loc='upper left')
plt.show()
위의 과정에서 채널별로 저장된 note 정보를 화면에 출력한다.
가로는 마디의 단위이고, 세로는 pitch의 단위인데, 옥타브 단위로 구분선을 두었다.
채널별로 색깔을 다르게 하고, velocity별로 alpha 값을 다르게 주었다.
matplotlib.pyplot 의 내용은 MIDI와 직접적인 관계는 없으므로 설명은 생략한다.
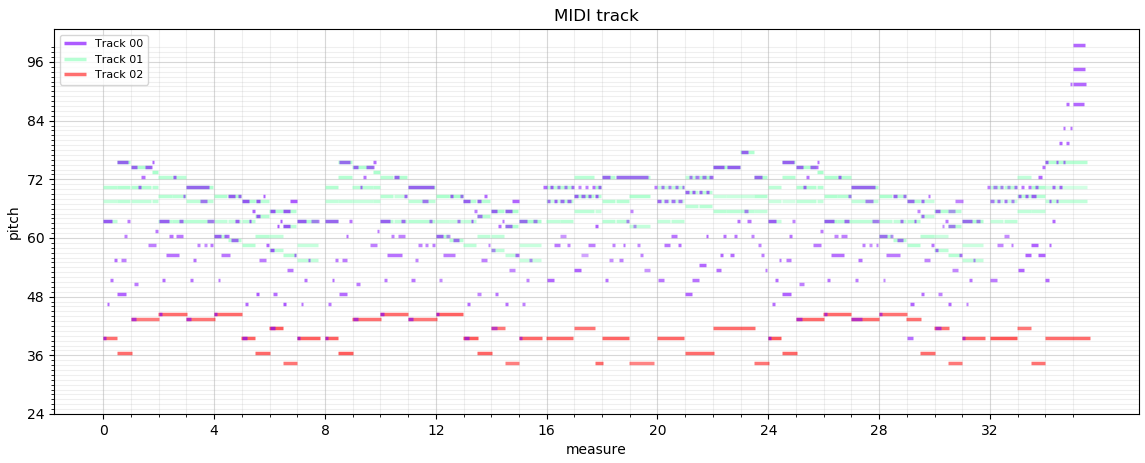
그리고 그 결과이다.
Posted by 안영기